A Detailed Guide to Using PhotoRec for File Recovery and Digital Forensics
What is PhotoRec?
PhotoRec is part of the TestDisk suite, a set of tools aimed at recovering lost data from a variety of file systems. Despite its name, PhotoRec can recover much more than just photos; it supports the recovery of many file formats including documents, videos, and archives.
What makes PhotoRec especially useful for forensic investigators is its ability to perform file carving, which involves scanning the raw data blocks of storage devices and recovering files based on their signatures, rather than relying on the file system metadata. This makes it possible to recover files even after they have been deleted or the file system is corrupted.
Step 1: Download and Install PhotoRec
1. Download TestDisk & PhotoRec:
- Visit the official website of TestDisk
- On the website, click on the Download link and choose the appropriate version for your operating system (Windows, Linux, or macOS).
- The downloaded file is usually a ZIP file. Extract it using built-in Windows tools or a third-party tool like 7-Zip.
- After extraction, you will see several files and folders, including the photorec_win.exe executable file.
Step 2: Launch PhotoRec
1. Open the Command Prompt:
PhotoRec runs in the command line (CLI), so you will need to open a Command Prompt on your system. To do this, search for "cmd" in the Start Menu and click on Command Prompt.
a. Navigate to the PhotoRec Folder:
- In the Command Prompt, use the cd (change directory) command to navigate to the folder where you extracted TestDisk and PhotoRec.
2. Run PhotoRec:
- Once you're in the correct folder, type the following command to launch PhotoRec:
- This will open the PhotoRec interface within the Command Prompt.
Step 3: Select the Drive to Recover Files From
1. Choose the Drive:
- Once PhotoRec launches, it will show a list of drives on your system. Use the arrow keys to navigate through the list and select the drive from which you want to recover files. This could be a hard drive, USB stick, or SD card.
- After selecting the drive, PhotoRec will ask you to choose the partition type (typically Intel/PC partition for most systems). If you’re unsure, the default option should be fine.
Step 4: Select the Recovery Options
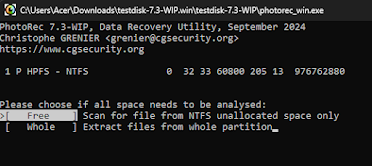
Choose the File System:
- PhotoRec will ask you to select the type of file system the partition uses. If you're working with a FAT32, NTFS, or exFAT system (typical for Windows), select the appropriate option.
- If the file system is damaged or you're unsure, you can select Other to allow PhotoRec to perform a deeper scan on the raw data blocks of the device.
Choose Where to Save Recovered Files:
- PhotoRec will prompt you to choose where you want the recovered files to be saved.
- IMPORTANT: Do not save the recovered files to the same drive from which you are recovering data, as this may overwrite the files you're trying to recover.
- Choose a different drive or folder to store the recovered files.
Step 5: Start the Recovery Process
1. Select the File Types to Recover:
- PhotoRec will ask you if you want to recover all file types or select specific types. If you know the type of file you're looking for (e.g., photos, documents, videos), you can choose to filter the types.
- By default, PhotoRec will try to recover all file types, which is ideal if you're not sure which files were lost.
2. Start Recovery:
- After choosing your settings, press Search to begin the file recovery process.
- PhotoRec will scan the device for lost files and attempt to recover them based on their signatures.
- The process might take some time, depending on the size of the drive and the amount of data.
Step 6: Review the Recovered Files
Check the Destination Folder:
- Once the recovery process is complete, navigate to the destination folder where you chose to save the recovered files.
File Structure:
- PhotoRec saves recovered files into subfolders organized by type. These folders might have generic names like recup_dir.1, recup_dir.2, etc.
- Inside these folders, you will find the recovered files. PhotoRec does not retain original file names, so the files might appear with random names or extensions. However, it is often possible to identify the files by their extensions or by examining the content.
Check File Integrity:
- After recovery, check the integrity of the files. Some files may be partially recovered or corrupted, especially if they were partially overwritten on the storage device. Try opening the files to ensure they are usable.
Step 7: Additional Tips and Best Practices
Use PhotoRec on a Copy of the Drive: Forensic investigators should always work on a copy of the original storage device to avoid altering evidence. You can use disk imaging tools like FTK Imager or dd to create a bit-for-bit copy of the drive, and then run PhotoRec on that copy.
Recovering Overwritten Files: If files have been overwritten or if the file system is severely damaged, PhotoRec’s file carving approach can still recover portions of files, but the process might be less successful. It's always better to recover files sooner than later to maximize the chances of successful recovery.
Advanced File Recovery: For more complex cases, where partitions are missing or the file system is heavily damaged, you can use TestDisk (another tool in the TestDisk suite) to attempt partition recovery before running PhotoRec.
Conclusion
PhotoRec is an excellent tool for recovering deleted or lost files, especially when dealing with damaged file systems or when traditional recovery methods fail. It’s a great addition to the toolkit of any forensic investigator or cybersecurity professional, allowing them to extract valuable data from storage devices, whether the data was deleted intentionally or lost due to system failure.


Comments
Post a Comment